Showing posts with label projects. Show all posts

The Arrival of Autumn: Pumpkin Spice Latte Recipe


I am so excited to say that Autumn is here! Well technically Autumn doesn't officially begin until 22 September, but hey! What's a few weeks? Autumn is by far my favourite season and not just because my birthday is soon... Although that is a plus! I love the watching mother nature take it's course by putting the earth to sleep for the winter. As we prepare for winter I am going to be sharing loads of great pictures and ideas for projects around the house. Today we are going to start with a fabulous little recipe for pumpkin spice. Pumpkin spice is one of those essential ingredients for Autumn and Winter baking. Its used in lots of yummy treats like pumpkin pie and sweet potato pie. With just four simple ingredients you can whip up a batch of your own pumpkin spice and store it in a jar in your kitchen cupboard. This way each time you need to bake something that requires pumpkin spice you will have it all ready to go! I have also included cute printable labels for your pumpkin spice jars! (Click here to view & print label)

Ingredients
2 tsp Nutmeg
2 tsp Allspice
4 tsp Ginger
8 tsp Cinnamon
Now that we have made some pumpkin spice I thought we could incorporate it in with this next tutorial for How to make a Latte without one of those fancy machines!

I ab-so-lute-ly love coffee. Whether its espresso, cappuccino, macchiato, or just a plain old americano I will drink it! If I had to choose a favourite I would probably say a latte. I love the strong flavour of the coffee combined with the soft milky texture. And the colour is very subtle and pretty. Most of us don't have a brilliantly expensive coffee machine to make delicious lattes at home, so we enjoy them in a lovely cafe or even a takeaway latte to enjoy while strolling down the street or off to work. But, what if you just wanted a cafe quality latte at home while you read the paper, browse your favourite blogs, or just watch TV and didn't want to out? I thought I'd share my little secret for making perfect lattes at home without using a coffee machine. 
I don't actually own any latte glasses, so for this tutorial I used a jam jar... I quite like it!


The first thing we need to do is get the coffee brewing. I used a cafeteria  . If you don't own a cafeteria, I would highly recommend getting one. You can make a delicious espresso with them! 

Now we want to heat the milk. Put just over half a coffee mugs worth of milk into a pot and heat gently on the stove. Be careful not to burn the milk. If you stick your finger in the milk you want it to feel very warm, almost hot.


Pour the milk into your french press. Pump the plunger a few times and you will see the milk start to froth at the top. Continue doing this until you have the desired amount of froth. If you don't own a french press no worries, There is a plan b! (Pour the warmed milk into a bowl and use a whisk (manual or electric) to froth. This may take a bit longer, but the result will be just about the same.


By this point the coffee should be brewed. Pour the coffee into the mug (however much you like). Now it's time to add the pumpkin spice! Add a small 1/4 tsp of pumpkin spice to the coffee and mix well. It would also be a good time to add any sugar if you take sugar in your coffee. 

Pour the milk into the coffee and scoop the remaining froth on top, sprinkle with a bit more pumpkin spice, and WALLAH!!

Computer Hope


How to Make a Toilet Paper Holder

DIY
Who's feeling crafty today?! Why not try this great tutorial for a handmade toilet paper holder? I got the idea simply from the lack of having one in our bathroom. Because we live in a rented apartment, we are pretty limited as to what we can do in terms of putting holes in the walls. So instead of going to the whole process of getting permission to drill from our landlord, I thought it might be a better idea to make a holder than doesn't have to be screwed into anything. 
So lets get started!


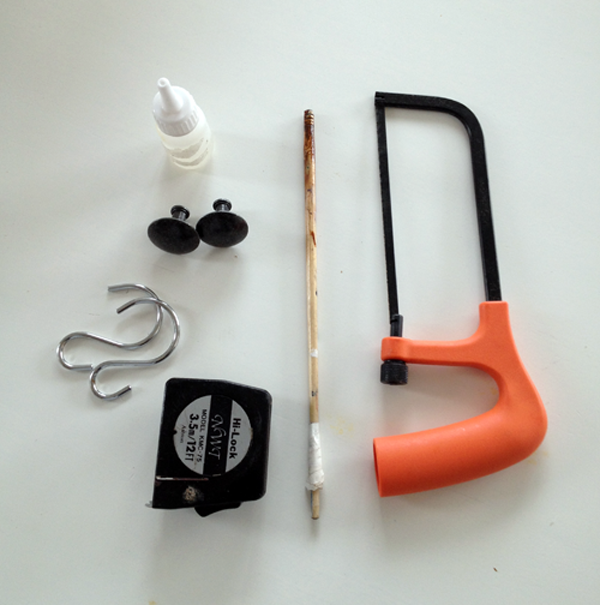
Materials

Dowel Shape (e.g paint brush, parts of a chair, tree branch, thin curtain rod...Be creative!)
Strong glue
2 hooks (can also be made from wire)
2 ends (door knobs, draw knobs, styrofoam balls) *If you can try to use something that is small enough to fit through the toliet paper roll
Sandpaper
Varnish or paint (optional)
Tape measure or ruler 
*If you don't have one handy you can eye ball it our check out vendian.org for a printable tape measure.

Step 1
Measure and cut the rod/dowel to the desired size.
If you are doing this tutorial before you've done your weekly shop and don't have a loo roll handy the size is just shy of 11cm.

You want the dowel to be at least 14cm so there is wiggle room and so that there is enough space at each end of the dowel to slide into the opening of the draw knob.

*If you live in an apartment you may not have an area suitable for sawing. So what you can do is use your kitchen chopping board. Your counters and tabletops will thank you!

Step 2
File down each end to a dull point. This is so each end of the dowel fits snug in the hole of the draw knob. *A metal file tool speeds up the process quite a bit.

Step 3
Once your satisfied with the length and fit you can sand down the rest of the dowel so its all smooth and even. Make sure you wipe the dowel with a clean damp cloth to get rid of any residue. 

Step 4
Now its time to paint or varnish if you wish. When choosing a colour, try to think of the theme of you bathroom. Your making a custom piece so you can use colours that aren't available in shops. For example bright green or polka dots! I have chosen a dark varnish (Jacobean Oak). I love having bright colours and rich dark woods throughout the apartment. 

*Remember when using varnishes it's important to allow for the proper drying times to achieve the best finishes (I had to wait 3 days for a 14cm dowel!)

Step 5
Once the paint/varnish if dry, glue each end of the dowel into the draw knob and let dry. Gently put the glue in one drop at a time until half of the hole is full. Then place the dowel in the hole and push so it's nice and snug. You can use some point with a pointy edge to help you. Alternatively you can drop the tip of the dowel into the glue, just make sure that you don't go down too far or things can get messy. 


Step 6
Its time to assemble our creation! Depending on what you are using for your hooks there are a few different ways you can put your piece together. As you can see from the hooks I used, the knob just slots into place. 

*You may need to use your wire so create a loop for the knob to sit in. 


Enjoy your new bathroom accessory!
Hand crafted ideas and accessories for your hand crafted life.